Before we are going to have a discussion of the topic of the best exporter for Adobe Premiere, we would like to ask you if you know the differences or advantages between Premiere Pro and ProRes? Surely, for different usages, we need different NELs, right? So in the following page, A best video exporter is offered there to teach you how to convert Adobe Premiere files to ProRes or encode to HEVC/H.265. Is that cool?

Do you own a camcorder or recorder that records to Prores, like blackmagic Production Camera, BMD 4K, an Atomos Ninja, Samurai or Convergent Design Oddisey recorder (CD has updated to include prores as recording format) or do you own or will you own the new Blackmagic Design URSA. However, for those Windows users, how could they make their footage accepted from Adobe to ProRes? Pavtube Studio is proud to own the strong ability of converting various video formats for almost all NELs for editing. Here the Pavtube Video Converter for Windows/Mac is offered for you!
Notes: Due to the recent upgrade of the Windows Video Converter, it can support the H.265/HEVC encode and decode. Download this upgraded version 4.8.2.0 for Windows, there will be no worries of encoding H.265/HEVC anymore. Is that cool?
Necessary steps we need to learn on how to export Adobe Premiere output workflow to ProRes:
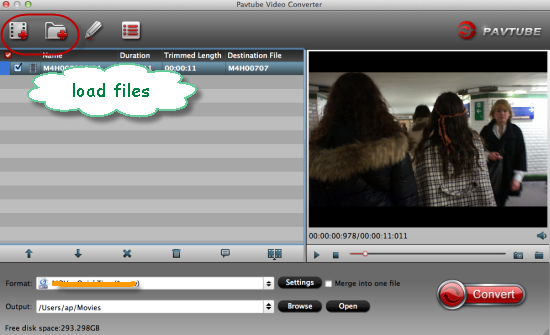
Step 1.Free download the Mac version on your computer and open the program until the main interface pops up in front of you. In the left corner, we need to load our source files with ‘Add video’ and ‘Add from folder’ each for individual video clips and complete folder. Or directly drag your files in is not a bad idea.

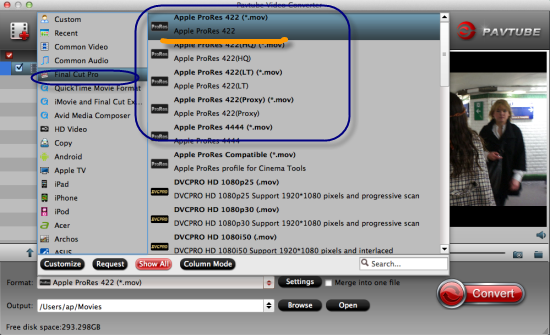
Step 2. Select suitable one to transcode original footage to ProRes

When you come to the output list, just do not be surprised with the various output choices for NELs. That’s one of the important points why Pavtube studio has a good reputation there. Find the ‘Final Cut Pro>>’Apple ProRes Codec 422(*.mov)’ as the suitable one according to your requirements.
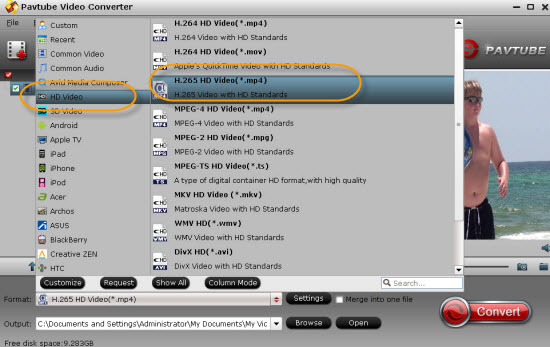
Tips: How to encode original files to H.265/HEVC? When you download and install the Windows version 4.8.2.0, follow the step 1 mentioned above and change the step 2: Choose the ‘HD Video’, could you find the added item ‘H.265 HD Video(*.mp4)’ there? That’s it! Though with a higher quality and small size, H.265 will also takes us much more time to wait for the result.

Step 3. Optional adjustment for advanced users
The newest version also keeps the popular function ‘Settings’ down for those advanced users. If you are familiar with this function button, you must know how to set your video size, bitrates, frame rate or even the audio channels. On the other hand, just leave them as the default is not a bad idea too.
With the strong capability of working various original video formats in NELs, Pavtube video converter has been walking on this converting way farther and farther. Back to the topic, if you have done all the preparation job, it’s time to hit the big red button ‘Convert’ on the main interface to get the conversion started. Related transfer guide on how to import your prores files here you can take a reference. Good luck!


For professional use!!!
I spent days looking at all the different H.265 video converters. I meticulously went through an analysis of cost and functionality and reviews. I also got Pavtube Video Converter with my purchase and have never looked back.
It’s easy, it’s fast, it’s safe and it’s amazing!! Thank you Pavtube.
Hello, jսst wаnted to tell ƴou, I loved this article. It was inspiring.
Keep on posting!
I think other web site proprietors should take this site as an model, very clean and fantastic user genial style and design, let alone the content. You are an expert in this topic!
I think this is one of the most significant info for me. And i am glad reading your article. But should remark on few general things, The website style is wonderful, the articles is really nice : D. Good job, cheers|