Currently, with a lot of 4K videos on YouTube or Vimeo, more and more people would like to enjoy the high 4K resolution videos. No doubt Sony is the first one who has announced that they have released out the latest 4K camcorders such like Sony FDR-AX100 or FDR-AXP33, etc. But how to share 4K XAVC movies on webs? Now let’s find more details on how to upload XAVC S files to Vimeo, YouTube and Facebook for sharing.

Further learning of Sony XAVC S with its’ features and limitation
Apparently, Sony is thoughtful enough by taking the post production issue into consideration. However, this doesn’t guarantee a smooth handling of the XAVC S footages since it is not a widely supported video format. Let’s say, after shooting some festive events by this 4K XAVC camcorder, you may consider showing your masterpiece on various websites like YouTube or Vimeo. Obviously, you cannot share your XAVC S footage on YouTube directly because there are best video formats for YouTube or Facebook etc.
Best solutions for uploading the XAVC S files to webs for sharing well
If you guys meet the issues like ‘The video has failed to process, please make sure you are uploading a supported file type’ when uploading your XAVC S files to YouTube, do not worry about it anymore. To solve the problems, there is a way out—using the Pavtube Video Converter (for Windows). By fast transcoding XAVC S to the supported formats for YouTube, Vimeo and Facebook. To illustrate my point better, a step-by-step guideline is specially provided as below you can take a good reference.
Guide on converting XAVC S to best supported for uploading to YouTube, Vimeo, Facebook:
Step 1. Download this 4K XAVC S Converter on your PC
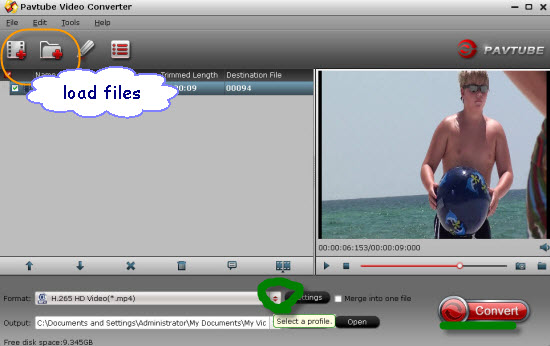
Install this trail version on your PC before purchasing to make sure everything goes right. After launching this app , click “File”>”Add Video/Audio ” to load your files, you can double click it to have a review on the preview window.

Step 2. Choose the suitable output items
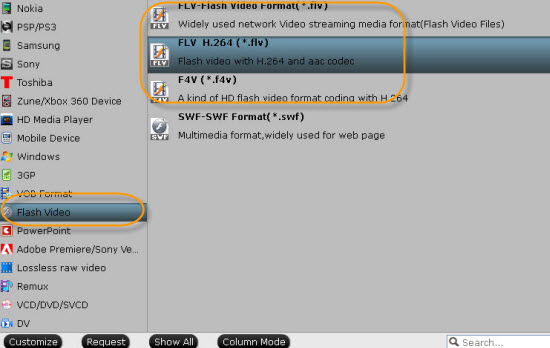
After loading your XAVC S files in. We should come to the output list to find some best output ones for YouTube, Vimeo and Facebook. For example, we can choose the ‘Flash Video’>>’FLV Video (*.flv)’ as the best video. While for Vimeo or Facebook, you can choose the ‘HD Video’>>’AVI HD Video (*.avi) as the right output ones.

Step 3. Adjust Bit rate, Frame rate if you need
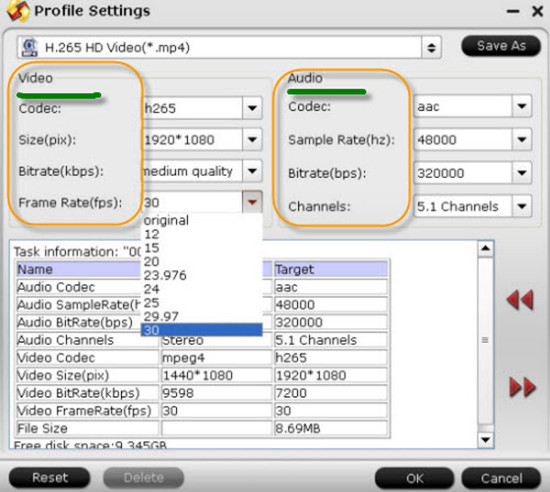
You can click “Settings” to adjust your parameters if you need. But if you do want to keep the original quality of the videos, you can just leave the default settings or choose “original”.

Back to the main interface and hit the ‘Convert’ button, here we are going to start the XAVC S conversion work for uploading to YouTube, Vimeo and Facebook to share with your family members or net friends.


I like the valuable info you supply on your articles. I’ll bookmark your blog and take a look at once more right here regularly. I’m moderately certain I will learn lots of new stuff proper right here! Good luck for the next!