When we talk about using software the first thing is how easy it is to use. How much comfortable you are to use it? If we know the shortcuts the work will become smooth and actually we will be enjoying it and if we are using mouse and doing tons of clicks then the work seems to be more hectic and forget about the efficiency. So, the first thing after buying the Avid media composer is to know the keyboard shortcuts. Later, in this article we will be discussing few basic and important shortcuts which will help you to the maximum in using the media composer.
Before moving toward the shortcuts we should talk about the versions and platforms on which you are running the software. Don’t worry about the different versions of Avid media composer because controls are 90 percent same. The important thing which we need to care about is the platform. We run Avid media composer on two different platforms. Platforms here refer to operating systems. Two platforms are Windows and Mac. There is slight difference between the controls in these two. As we all know that we have two important keys in windows which are generally used in most of the shortcuts, Alt and Ctrl. Whereas in Mac Alt is replaced by Option and Ctrl is replaced by a unique square symbol which all the Mac users will be familiar with. Only these two control keys play the major role in making the composer easy to use.
It’s time to discuss some basic and important shortcut keys which will help you guys to use the Avid media composer effectively. Following is the list of shortcuts which are used frequently while editing.
1. Ctrl + N will help you creating a new bin where you can work and use different tools. You can imagine it as a project window where you perform editing.
2. Ctrl + A shortcut will make easy to select all the items in the current been. That means with the help of the strokes of these two keys you can select all the items in current bin.
3. Ctrl + W help closing the open windows, directories and bins. This shortcut is helpful when you have different windows open and it is making your work complex.
4.Ctrl + P do the same work as it does in all other programs. It helps print the bin in the desired format.
5. Ctrl + D duplicate the selected clips, segments or titles.
6. Ctrl + l select clips or sequence in the bin, then use this shortcut to open the console window, which will display useful information.
7. Shift + Ctrl + G creates a group clip from selected master clips and sub clips.
The above mentioned shortcut keys are some of the important and the most basic shortcuts used while working in a bin on Windows platform.
Let us discuss the shortcuts used when working with audio.
8. Alt + pan slider will snap to mid in audio mix tools.
9. Alt + volume slider will snap 0db in audio tools.
10. Alt + audio track monitor button is used to select tracks for audio scrub monitoring.
11. Alt + Track solo button is used to mute the selected track. The advantage is that you can mute multiple tracks and it can be up to 8 tracks.
12. Hold Alt and drag the keyframe will move the audio keyframe in the timeline in horizontal fashion.
As we have learnt some basic audio editing shortcuts now it is time to learn about function keys. You can find function keys on the top row of the keyboard where you can find the F keys followed by numbers 1 to 12. Let see their use.
14. F1 will mark the in-point of a sub clip and at a later time the in-point will be updated.
15. F2 will mark the out-point of a sub clip.
16. F3 adds a red locator to the clip.
Above mentioned three function keys are the basics of capturing. You can try f4 – f12 keys and check their use. Basically, after f3 all the function keys are used to add different color locators to the clip. Let us move to the most important part of a media composer which is editing and if we know the shortcuts then we can edit a clip, frame, or video within a very time as compared to the conventional methods.
17. Hold the Ctrl key and press Z will help undoing the work performed. Let say if you have done some editing and you are not satisfied then you can use this shortcut to go back to the previous set.
18. Hold the Ctrl key and press R is just opposite of Ctrl + Z and it is used to redo the undone work.
19. Hold the Ctrl key and press C is used to copy the clips between the mark-in and mark-out on the selected text.
20.Hold the Ctrl key and press V is used to paste the copied material.
We have discussed 20 basic shortcuts which will help you make your job easier and all the above mentioned shortcuts are for windows platform. If you are working on Mac PC then you have to change the alt key with the option key and ctrl key with a unique square looking key on the Macintosh keyboards.
We have covered the basic shortcut keys which will make you job easier than ever in using the Avid Media Composers. There are number of shortcuts which you can use but for a beginner it is always suggested to start with basics and later on when you become familiar with the software you can start learning different shortcuts as well. But for most of the purpose these shortcut keys will be more than enough.
I hope that you have got maximum help from this article.
How to Convert and Import Any Video in Avid Media Composer
To encode any video to Avid DNxHD codec, you can get help from Pavtube Video Converter for Mac, the outstanding and simple to use application enables you to directly output Avid DNxHD format, apart from that, you can also use the “Profile Settings” function to adjust the output file video codec, size, bit rate, frame rate and audio codec, sample rate, bit rate and channels to make it more compatible with Avid editing programs.
First free download and install Pavtube Video Converter on your Mac, and then launch it. Now just follow the step by step guide demonstrate how to convert import any video in Avid Media Composer.
Click “Files” menu, from its drop-down option, select “Add Video/Audio” to load source files to the program.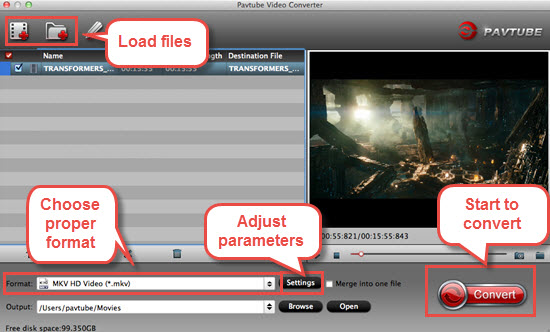
Step 2: Select Avid DNxHD as output format.
From “Format” drop-down panel, select “Avid Media Composer” > “Avid DNxHD (*.mov)” as the output file format for editing with Avid editing programs.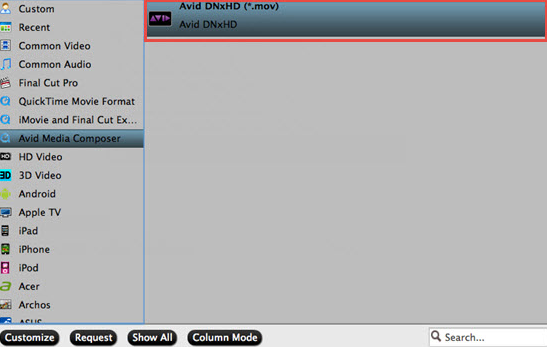
Step 3: Adjust output profile settings.
Open “Profile Settings” window to adjust the output file video codec, size, bit rate, sample rate, audio codec, sample rate, bit rate and channels according to your own needs.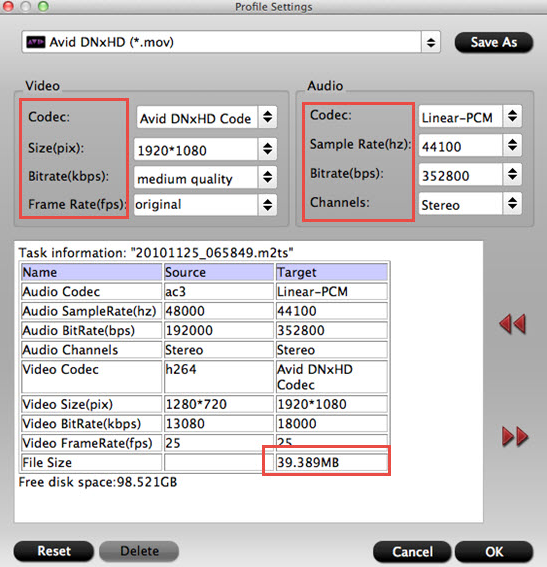
Step 4: Convert source files to Avid Media Composer.
After all the settings is over, start the conversion process by hitting the right-bottom “Convert” button.
When the conversion is completed, click the “Open” icon on the main interface to find the converted files, you can then import and edit those files with Avid Media Composer with no problem.


