As a HD video format jointly developed by Sony and Panasonic, AVCHD uses Advanced Video Coding (AVC) compression (also known as MPEG-4 part 10 or H.264) to achieve high-quality images and low data rates.
Why convert AVCHD to Prores 422/422 HQ/422 Proxy/422 LT?
For Final Cut Pro 7 or X users who have captured some AVCHD video with your Sony, Canon or Panasonic camcorder, you may wish to load the footage into this professional editing program for doing some post editing workflow. For Final Cut Pro 7 users, you will need to transcode AVCHD to one of FCP 7 compatible editing codec since FCP 7 has no native input support for this format. For Final Cut Pro X users, even although AVCHD is included in its supported media file formats, however, as we have stated above, AVCHD uses Advanced Video Coding (AVC) compression, the decoding of AVCHD for playback on FCP X’s timeline will require a lot of processing power. To reduce the processing demands on your computer, it would be much ideal for you to transcode AVCHD to a less processor-intensive codec such as Apple Prores codec.
What’s more, the color sample ratio of AVCHD is 4:2:0, with 8 bits per sample, which means you are potentially compromising your effects and especially color correction and composing gradients. While Apple Prores is a 10 bit codec, which can process a lot of more color data and make the color correction process easier.
Best AVCHD to Apple Prores converter
When you are searching on the market, you may find that there are many programs on the market can complete the job for you. However, if you are looking for a powerful yet simple to use application to get the job completed, we highly recommend Pavtube Video Converter for Mac to you. The program has full support for AVCHD mts or m2ts files recorded by Sony/Canon/Panasonic camcorder, you can easily generate Final Cut Pro 7/X best compatible high quality and high performance editing codec Apple Prores in various different file formats including Apple Prores 4444, Apple Prores 422, Apple Prores 422 HQ, Apple Prores 422 Proxy and Apple Prores 422 LT.
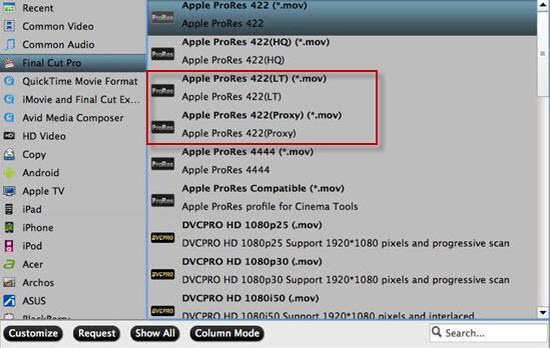
If you Mac computer are powerful enough to handle multicam and high-resolution video and you are going to do many effects editing work with FCP 7/X, you’d better choose to output “Apple Prores 422(*.mov)”or “Apple Prores 422(HQ)(*.mov)” for better performance. However, if your Mac computer is old or slow, or you just want to do some rough editing, you can select to output “Apple Prores Proxy)(*.mov)”or “Apple Prores (LT)(*.mov)” format to save more space and bandwidth.
Edit AVCHD with built-in editing function
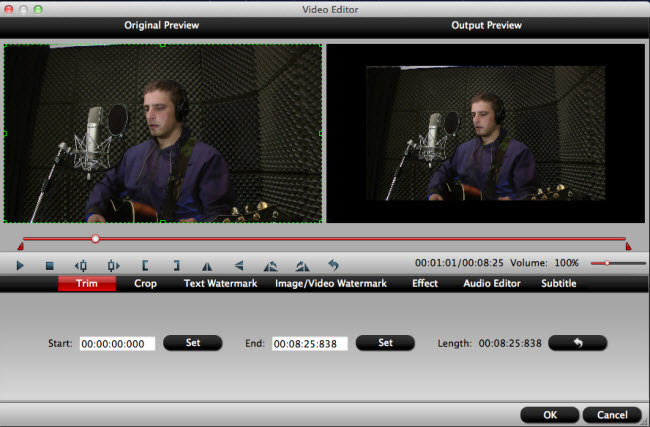
Before loading the AVCHD footage into Final Cut Pro 7 or X for professional editing, you can finish some simple editing task with the program’s built-in editing tools. If you don’t want to move the whole video into Final Cut Pro, just use the trim function to remove unwanted parts or segments from the video, if there are black bars around the video frame, you can use the crop function to cut then off. In addition, you are also allowed to deinterlace interlaced 1080i video into progressive form to get better picture effect.
Wish to produce Prores codec on Windows, the good news is that you can also use the Windows version of Prores Converter - Pavtube Video Converter to encode AVCHD to Prores in different types on Windows 10/8.1/8/7.
How to Convert AVCHD to Prores 4444/422 HQ/422/422 LT?
Step 1: Load AVCHD video.
Download the free trial version of the program. Launch it on your computer. Click “File” menu and select “Add Video/Audio” or click the “Add Video” button on the top tool bar to import AVCHD mts, m2ts files into the program.

Step 2: Select output file format.
Click “Format”bar, from its drop-down list, select your desired Prores format according to own needs. If your computer is powerful enough and you wish to do much editing effects, just output “Apple Prores 422(*.mov)”or “Apple Prores 422(HQ)(*.mov)” for better performance.

if your Mac computer is old or slow, or you just want to do some rough editing, you can select to output “Apple Prores Proxy)(*.mov)”or “Apple Prores (LT)(*.mov)” format.

Step 3: Edit AVCHD video with built-in editing tools.
Select a video or movie to activate the Edit menu. When a video or movie is selected, click the pencil like Edit icon on the left top tool bar to open the video editor window, here, you can trim or cut video by dragging the slider bars or setting the start time and ending time, crop video area by dragging the dash green line around the video frame or check check off “Deinterlacing” option to transform the interlaced video into a progressive form to keep good image quality, you can also do other editing work according to your own needs.

Step 4: Begin the conversion process.
Clicking the Convert button on main interface to pop out AVCHD to Prores 422/422 HQ/422 Proxy/422 LT Conversion window with conversion information such as Time elapsed, Time left, Generated size, and Estimated size.
After the conversion, you can click “Open output folder” to popup output directory with the converted files. You can then able to import video to FCP 7/X for high quality and high performance editing workflow.


