For people who have just finished video recording with the free video recorder OBS (Open Broadcaster Software) and try to import the OBS MP4 files to Camtasia Studio for some professional post editing workflow, you may often encounter the video importing errors listed below:
“I’m trying to open the mp4 files saved locally by OBS with Camtasia Studio 8 to do some post-processing and it is failing because it claims it’s unsupported media or missing codecs. However if I open the same .mp4 file with VLC 64 and use the convert/save option to basically re-save it (saving using original video file), camtasia will open it the resuling file just fine. I’ve tried changing the settings which OBS uses for recording of video and audio, but none of them work. Any suggestions?”
Why fail to load OBS MP4 video to Camtasia Studio?
To answer this question, we should be clear Camtasia Studio supported input file formats. After an online searching, we get the information that although Camtasia Studio has included importing support for MP4 files, however, the MP4 files should be encoded with AVC/H.264 codec, in addition, the frame rate of the MP4 files should be 30 fps or less. It also means if the MP4 file are encoded with other incompatible codec or frame rate, Camtasia Studio will refuse to open them. Obviously, the recorded MP4 file by OBS isn’t recorded with a video codec that is supported by Camtasia Studio.
Convert and Import MP4 to Camtasia Studio
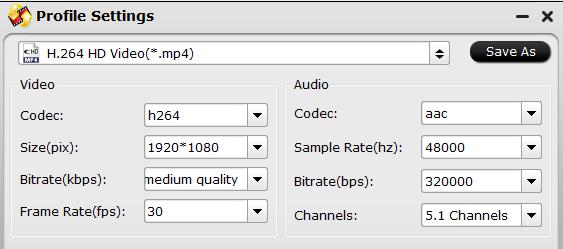
To fix this incompatible issue, you will need to perform a codec and frame rate conversion process. Here, you can get the job easily done with our powerful and simple to use Camtasia Video Converter – Pavtube Video Converter. The program has enhanced media compatibility with no only OBS MP4 files but also other 4K/2K/HD/SD MP4 files encoded with the compression codec of H.264, H.265, MPEG-1, MPEG-2, VC-1/WMV, MPEG-4 (A)SP, etc. Thanks to its batch conversion mode, you can load multiple OBS MP4 file at one time for conversion. You can easily convert OBS MP4 to Camtasia Studio best supported H.264 MP4 files with fast conversion speed and perfect output file quality. And then adjust to output the frame rate as 30 fps or less in the “Profile Settings” window, you can also tweak other settings according to your own needs.
Tips: Pavtube Video Converter supports hard-ware encoding acceleration, you can get up to 6x faster H.264 codec encoding speed as long as you run your computer on a Graphic card that supports Nvidia CUDA/AMD App technology.
Related article: Convert Camtasia Recordings to Any Format | Convert Camtasia Recordings to MP4 | Convert Camtasia Recordings to AVI
Edit OBS MP4 video with built-in editing tools
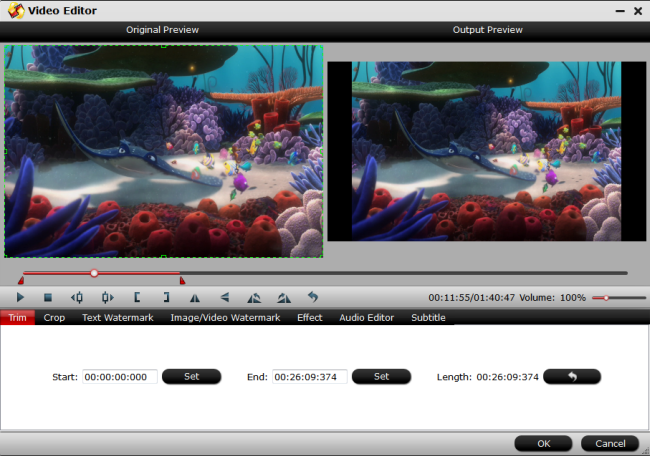
Besides converting video for Camtasia Studio, the program can also assist you to complete some simple editing work before loading the video into Camtasia Studio for professional post editing workflow. You can flip video horizontally or vertically, rotate video clockwise or counterclockwise to get it displayed in the right angle, trim or cut video to remove unwanted parts or segments, crop video to cut off the black borders or unwanted size area, personalize video with video/image/transparent text watermark, apply special rendering effects like Gray, Flip Color or Aged Flim, etc to your video or add external SRT/ASS/SSA subtitles to video.
For Mac users, you can switch to download Pavtube Video Converter for Mac to perform the conversion on macOS High Sierra, macOS Sierra, Mac OS X El Capitan, Mac OS X Yosemite, etc.
Tips: H.264 codec encoding acceleration is not available for Pavtube Video Converter for Mac.
Step by Step to Convert OBS MP4 for Camtasia Studio Editing
Step 1: Add OBS MP4 files into the program.
Run the program on your computer and click “File” > “Add Video/Audio” or “Add from folder” to add OBS MP4 files into the program.

Step 2: Output Camtasia Studio supported editing formats.
From the pull down menu of “Format” , then you will be able to select Camtasia Studio best compatible editing formats “H.264 HD Video(*.mp4)” under “HD Video” main category.

Step 3: Adjust output video frame rate.
Click “Settings” to open “Profile Settings” window, here, you can change the output frame rate to less than 30fps from the “Frame Rate(fps)” drop-down options, you can also tweak other settings according to your own needs.

Step 4: Edit OBS mp4 files with built-in editing tools.
On the top tool bar on the main interface, click the pencial like icon to open “Video Editor” window, you can flip or rotate video, trim the video to remove the unwanted parts by setting the start and end time, crop to remove the black borders or unwanted area by dragging the dash line around the video frame, flip video, apply special rendering effect, add external subtitles, etc.

Step 5: Start the final conversion process.
After all setting is completed, click right-bottom “Convert” button to begin the OBS MP4 video to Camtasia Studio best compatible editing format conversion process.
When the conversion is completed, you will have no problem to load and import OBS MP4 to Camtasia Studio for the best post editing workflow.


