MPEG Streamclip is a free and versatile program with tools to change appearance, file type and compression of your videos. One of the most useful function of MPEG Streamclip is its compression capabilities. Sometimes, you may wish to share a video with a friend using Dropbox, a data DVD or a video sharing website, but the file is too large and not conveniently for the sharing method you choose. The good news is that MPEG Streamclip lets you adjust the codec, frame rate, bit rate and aspect ratio. The following part will show you how to compress video with MPEG Streamclip with best quality?
Compress Video with MPEG Streamclip
First, download and install MPEG Streamclip on your computer. Open up the program, locate the video that you wish to compress in your file browser. Then, simply drag and drop the video file into MPEG Streamclip. Under the program’s File menu, there are the options to export your video in various formats including QuickTime, MPEG-4, DV, AVI and other formats. Choose the desired format for your video and you’ll be taken to an export dialogue with all of the compression controls for that specific format.
Related article: Compress VOB on Windows/Mac | Compress AVI File Size | Best Way to Compress Video for YouTube
How to choose compression format?
MPEG-4 codec: Only allows for H.264 and Apple MPEG4 compression codec
QuickTime and AVI: Include a wide range of compressors, both open source and proprietary
H.264: It is good for compressing video files smaller for sharing purpose
How to adjust video bit rate?
Standard bit rate for SD video: 2,000-5,000 kbps
Standard bit rates for HD video: 5,000-10,000 kbps
After you enter a value, you’ll see an estimated file size appear to the right. This will let you know if your exported file will be small enough for your sharing method – keep in mind that DVDs commonly hold 4.3GB of space, and video uploads for sharing website max out around 500MB.
How to choose video frame rate?
- Match this to the frame rate of your original file unless you shot at a very high frame rate
– Choose frame blending and better downscaling if there’s an inconsistency between your chosen frame rate and the frame rate of your original video – this will maximize the quality of your exported file.
– If your video is interlaced, i.e. the frame rate is 29.97 or 59.94 fps, choose “Interlaced Scaling”.
– If you shot progressive i.e. 24, 30 or 60 fps, un-check this box
Best simple alternative to MPEG Streamclip to compress video
It may be a little difficult for some beginners to tweaking those complicated settings with MPEG Streamclip on your own. The good news is that here comes some free video compressing program. If you are looking for a powerful yet simple to use application to compete the job, we highly recommend Pavtube Video Converter Ultimate to you.
The program has full importing support for not only 4K/2K/HD/SD video with virtually any file formats but also commercial Blu-ray/DVD disc. Thanks to its batch conversion mode, you can load multiple digital video into the application for conversion at one time. The program offers various different ways for you to compress media: change output codec or format, adjust output video resolution, bit rate, frame rate, audio codec, bit rate, sample rate and channels. For the detailed information, please visit: compress video file size without quality loss.
Apart from adjusting output video/audio profile parameters, you can also compress video by trimming or cutting video length or splitting large video into smaller parts or segments by file size, count or length.
|
Get Pavtube Video Converter Ultimate with 20% off discount, coupon codec: 45K2D47GJH
|
Step by Step to Compress Video with Pavtube Video Converter Ultimate
Step 1: Add video files that you desire to compress with.
Download and install the best Video Compressor. Click “File” menu and select “Add Video/Audio” or click the “Add Video” button on the top tool bar to import source video files into the program.

Step 2: Choose output file format.
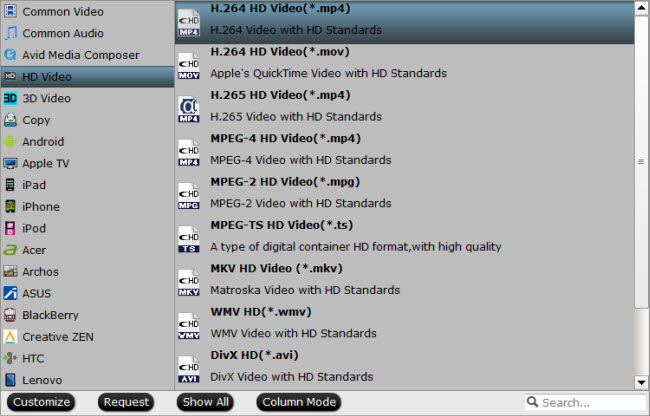
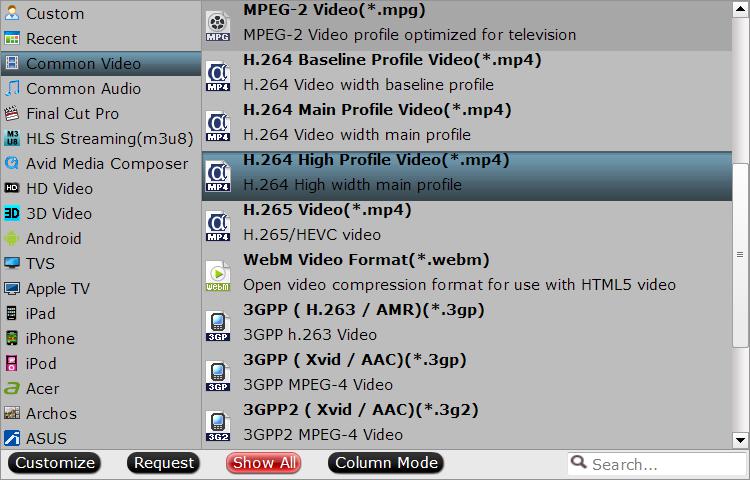
From “Format” bar drop-down menu, we choose the most efficient and device compatible compression codec “H.264 HD Video (*.mp4)” under “HD Video” main category. For 4K video uploading, it would be much ideal for you to select “H.264 High Profile Video(*.mp4)” under “Common Video” main category.
Output H.264 HD Video

Output 4K High Profile Video

Step 3: Properly tweak output profile parameters.
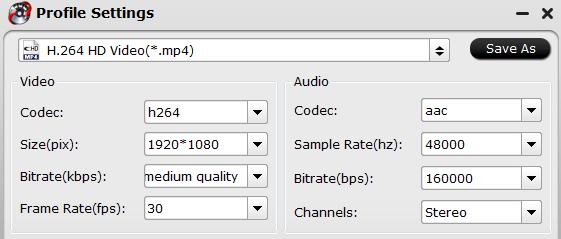
Click “Settings” on the main interface to open “Profile Settings” window, here, change output video codec, bit rate, frame rate, resolution and audio codec, bit rate, sample rate, channels with the principles we listed above to produce a smaller file size with no quality loss.

Step 4: Begin the video file size reducing process.
After all setting is completed, hit the “Convert” button at the right bottom of the main interface to begin the video file size compressing process.
When the conversion is finished, click “Open Output Folder” icon on the main interface to open the folder with generated files. Then you can get a smaller file size without any quality loss for better storage and smooth sharing.


