AVCHD is an acronym for Advanced Video Coding High Definition. It’s a file format for recording and playback of HD video. It is typically stored on flash memory card or hard drives. It is great for recording footage from the camera, but it can be a challenge for editing.
Editing Standard Definition footage on an older computer is easy, but editing AVCHD is another story. If your AVCHD clips stutter and drop frames when you preview in a NLE, it can be impossible to do a good job of editing. The newer full-fledged NLEs will edit AVCHD files. They also require powerful, robust computers. But for those with older computers or software, editing AVCHD can be a torture.
Why is it so difficult?
There are several reasons:
1. HD video files have up to six times the resolution of SD compressed into about the same file size. It’s this heavy compression that makes AVCHD so demanding for native editing.
2. Older computers have slower processors which may not be suitable for the high demands of editing native AVCHD files
3. The video codec avchd or h.264 codes is actually a finishing codec. When you edit with this it is highly compressed. The computer has to decompress the file before you can even see it on the screen. So when you add edits, transitions, titles and so forth, these put an even greater strain on your CPU.
If you have the bucks, you can upgrade your computer to one with a faster processor, lots more RAM as well as more storage since you won’t have tape backups.
But before you do anything, first install the software that came with your DSLR or AVCHD camcorder. This will make editing and transcoding much simpler.
What is the solutions?
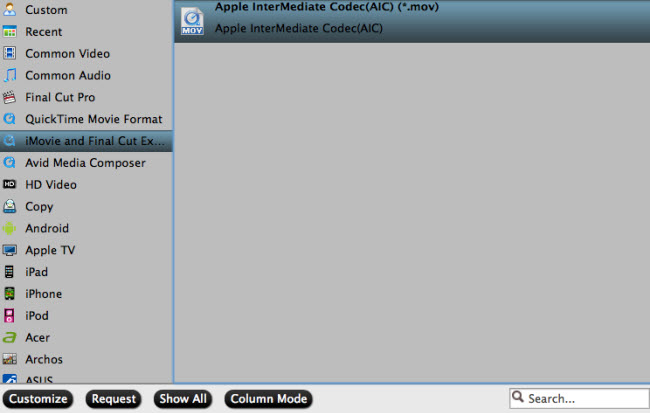
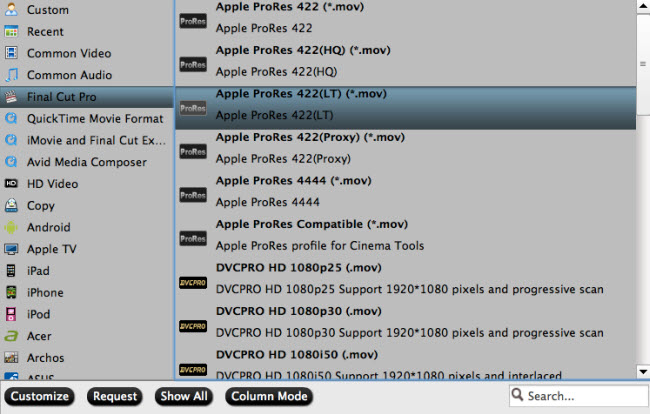
If your computer is not powerful enough, so is there any way to play and edit the AVCHD files on Windows system and OS system without any curbs? You can try the best AVCHD transocder – Pavtube Video Converter Ultimate which is an application that you can use to encode AVCHD media files to multiple formats, including MPEG-1, MPEG-2, MPEG-4, H.264, H.265, DNxHD, ProRes in MP4, MKV, AVI, WMV, MOV formats. It offers you massive non-linear editing software presets with the best settings, therefore you can convert the AVCHD files to MPEG for Premiere, Sony Vegas for postproduction. For Mac users you can transcode the AVCHD to "Apple InterMediate Codec(AIC)(*.mov)" for iMovie and Final Cut Express, or "Apple ProRes 422(*.mov)" for Final Cut Pro.
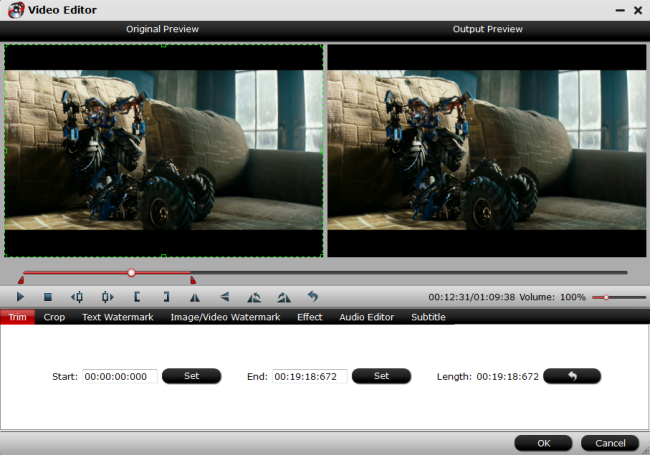
Apart from transcoding videos, it also works as video editing software and satisfy your basic editing needs. With it, you can merge separate video clips into one, insert external subtitles to video, add transparent text watermark/image watermark to video, crop black bars around the video frame, split large video files into small parts, adjust video color brightness, contrast, saturation, remove audio from a video or replace audio in video, trim video footage, crop unwanted area from video, etc.
If you are familiar with video format, container and codec, you can directly choose video format, then adjust the video and audio bitrate, frame rate, resolution, channel and more parameters to make the outputed video more fit in your video player and multimedia devices. With this feature, you even can compress 4K to 1080p video or upscale lower resolution video to higher resolution video. If you don’t know the video knowledge, you can directly choose iPhone X, iPad Pro, Samsung Galaxy S8, FCP, Adobe Premiere, After Effects and more devices optimized presets.
Steps to Convert AVCHD to Premiere/Sony Vegas/FCP/iMovie Compatible Video Formats for Further Editing
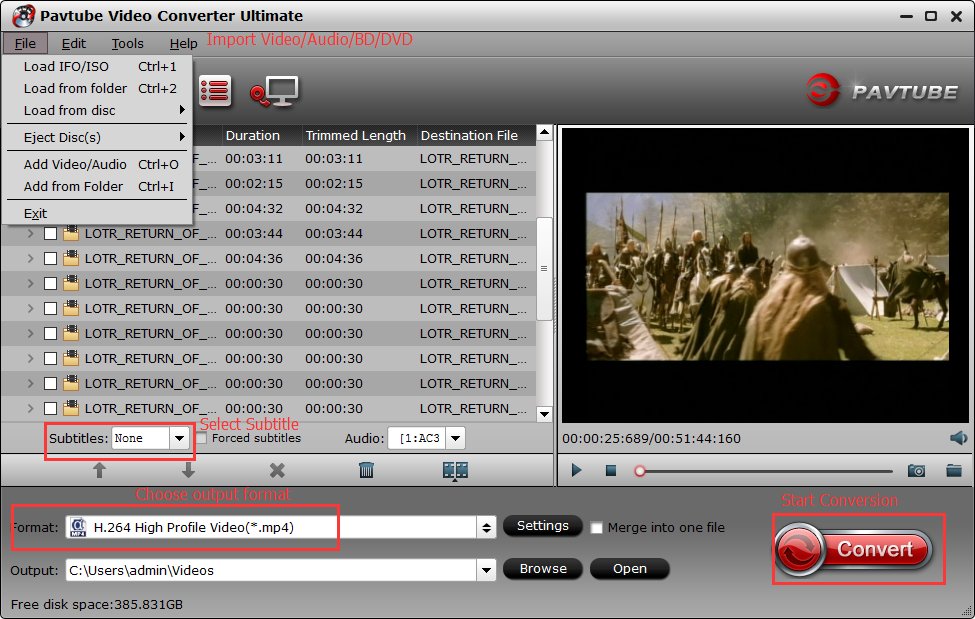
Step 1: Load protected AVCHD files into the program.
Install and launch AVCHD video converter program on your computer, click "File" > "Add Video/Audio" or "Add from Folder" to load AVCHD files into the program. You also can directly drag and drop the AVCHD files into the software. Batch conversion is supported here. To play the AVCHD file, just click the "Preview" bar and play the video.

Step 2: Choose output file formats.
Click "Format", from its drop-down option, you can choose MOV, AVI, M4V, MKV, H.264/H.265 MP4, etc. If you want to edit AVCHD with NLE software, you can choose the MPEG-2 preset for NLE software from "Adobe Premiere/Sony Vegas" category.

Choose the "Apple InterMediate Codec(AIC)(*.mov)", "Apple ProRes 422 (*.mov)" for iMovie/FCP postproduction from "iMovie and Final Cut Ex…" and "Final Cut Pro" category respectively on Mac version software.
Option 1.

Option 2.

Click "Settings" on the main interface to open "Profile Settings" window to tweak the output video codec, bit rate, sample rate, resolution, audio codec, bit rate, sample rate and channels to make the output video more fit with your devices or programs.
Check an item to active the "Video Editor" function, then click the pencil like icon on the top tool bar to open the "Video Editor" window, you can trim the AVCHD file length, crop video black bars, add external subtitles to AVCHD files, apply sepcial rendering effect, remove/replace audio in video, etc.

Step 4: Start the conversion process.
After all setting is compelted, press the "Convert" button in the right-bottom and the AVCHD video conversion process will start automatically. When the covnersion stops, please go to the output folder to get the covnerted files.
Related Articles
Any Product-related questions?support@pavtube.com


