When you have completed recording and editing your video project in Camtasia, you will need to produce a compatible MP4 file format for easily sharing the exported Camtasia files on your computer, mobile devices, TVs, media streaming devices or video sharing sites, etc. The following article will show you how to export Camtasia recordings to MP4 in 2 different ways.
Solution 1: Export Camtasia recordings to mp4 directly from Camtasia Studio
Solution 2: Save Camtasia recordings to MP4 with third-party video converter
Solution 1: Export Camtasia recordings to mp4 directly from Camtasia Studio
1. Open Camtasia studio.
2. Click on “Import media.” Select the .camrec file you wish to convert to MP4 and click “Open” to import it into the clip board.
3. Drag the file from the board onto the video timeline.
4. Click the “Produce and share” button present near the video screen to open the Production Wizard.
5. Select “Custom production settings” from the drop-down and click “Next.”
6. Select “Export to MP4(*.mp4)” from the list of formats to convert the file into MP4 format.
7. Click “Next” for all the other selections to continue with default settings.
8. Provide a filename into the Production Name box on the Produce Video screen and select a location to save the file.
9. Click on “Finish”. After conversion, the video will play automatically and also saved to your selected location.
10. Click “Finish” to exit.
Solution 2: Save Camtasia recordings to MP4 with third-party video converter
For those people who wish to save Camtasia recordings to MP4 or other popular file formats with various different compression codec, file resolution, bit rate, frame rate, etc. We highly recommend you to download a third-party Camtasia recording to MP4 video converter such as Pavtube Video Converter. With the program, you can easily convert Camtasia recordings to MPEG-4, H.264 Baseline Profile MP4, H.264 Main Profile MP4, H.264 High Profile MP4, H.265 MP4, MPEG-4 HD MP4, H.264 HD MP4, H.265 HD MP4 or other popular SD/HD/2K/4K file formats such as AVI, WMV, MOV, MKV, FLV, TS, 3GP, 3GPP, Divx, Xvid, MPEG-1, MPEG-2, etc. Besides that, you can also use our program to directly output hot devices and editing program preset profile formats.
Related article: Convert Camtasia Recordings to Any Formats | Camtasia Studio Supported File Formats
Edit Camtasia Recordings with built-in editing tools
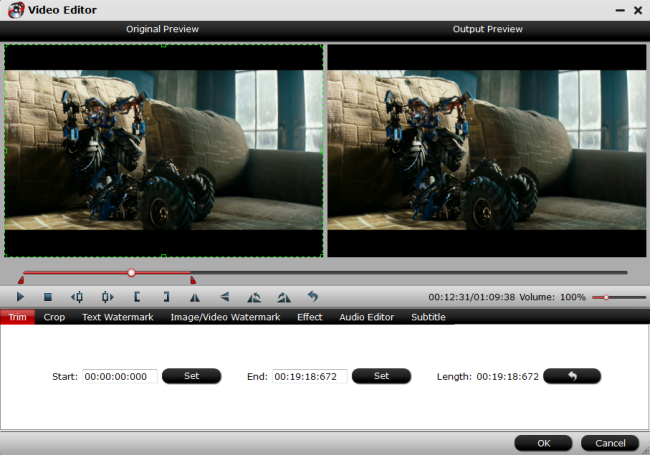
Besides converting Camtasia recordings for you, our program can also work as a simple video editor alternative to Camtasia Studio. You can use the versatile built-in editing tools to flip or rotate video angel, trim or cut video to remove unwanted parts or segments, deinterlace interlaced video into progressive form, crop video to remove the black edges or size area, add video/image/transparent text watermark to video, split large video into small parts by file size, count or length, merge separate video into one file, apply special rendering effect to video, insert external SRT/ASS/SSA subtitle to video, etc.
For Mac users, please switch to download Pavtube Video Converter for Mac to perform the conversion on macOS High Sierra, macOS Sierra, Mac OS X El Capitan, Mac OS X Yosemite, etc.
Step by Step to Convert Camtasia Recordings to MP4
Step 1: Load Camtasia recording files into the program.
You can directly drag and drop the Camtasia recording files into the program or click “File” > “Add Video/Audio” or “Add from Folder” to load Camtasia recording files into the program.

Step 2: Choose output file formats.
Click “Format”, from its drop-down option, choose one of your desired MP4 file formats as the final output file format. Here, we select a more compatible file format such as “H.264 HD Video(*.mp4)” under “HD Video” main category. You can also choose other MP4 format or device preset profile MP4 formats according to your own needs.

Tips: To get better output video quality and audio effect, you can flexibly adjust the output video codec, bit rate, sample rate, resolution, audio codec, bit rate, sample rate and channels in the program’s “Profile Settings” window.
Step 3: Edit Camtasia recording video.
Check an item to active the “Video Editor” function, then click the pencil like icon on the top tool bar to open the “Video Editor” window, you can trim video length, crop video black bars, add watermark, apply special rendering effect, remove/replace audio in video, etc.

Step 4: Start the conversion process.
After all setting is completed, press the “Convert” button in the right-bottom to start the Camtasia recordings to MP4 format conversion process.
When the conversion is over, click “Open output folder” to pop out the converted files, you will then have no problem to play, edit or share Camtasia MP4 video on any devices or programs as you like.


